
Virtual assistants are here to stay. Among them is Siri, the virtual assistant of all Apple software, from macOS to watchOS through iOS and iPadOS. After 11 years available among us, Siri has improved exponentially over the first versions. However, there are still assistants that outperform in terms of the ability to perform actions at the software level as well as the understanding of what the user wants at a given moment. Today we will analyze the customizable functions of Siri on our iPhone and iPad and, among them, We will learn to change the voice of our virtual assistant.

A little background before we start: who is Siri?
Before we start with all the Siri customizations, let's introduce this virtual assistant from Apple. When we talk about virtual assistant we are not saying anything other than artificial intelligence with its own voice. This artificial intelligence came in its first version in 2011 to iOS. Over time, the improvement of its code as well as all the technology behind it allowed it to be incorporated into the rest of the Big Apple operating systems: tvOS, watchOS, macOS and iPadOS.
Siri makes use of natural language processing to interact with users and answer questions, make recommendations, do what the user asks, and much more. These actions, in part, are carried out through external queries to web services Apple Lossless Audio CODEC (ALAC),. However, little by little Apple is giving Siri more intelligence and power by incorporating some actions into the hardware of the devices itself, so there are many actions that can be solved without an Internet connection.
As we mentioned, Siri has improved a lot in recent years. However, it has great competitors ahead of it that have also improved a lot, such as the Google Assistant, Amazon Alexa or Microsoft's Cortana. They are valid options and the fact that there is so much competition makes companies spend time and effort in achieve useful and effective artificial intelligence on all your devices.
Basic Siri settings on iOS and iPadOS
If you are still a bit new to Siri, first things first: how do i activate it? Very easy. If you have an iPhone prior to the X model, you will have to press the Home button for a few seconds so that the virtual assistant icon is enabled and you can start talking to her. On the contrary, if you have an iPhone X or later models, you will have to press the lock button for a few seconds to invoke it.
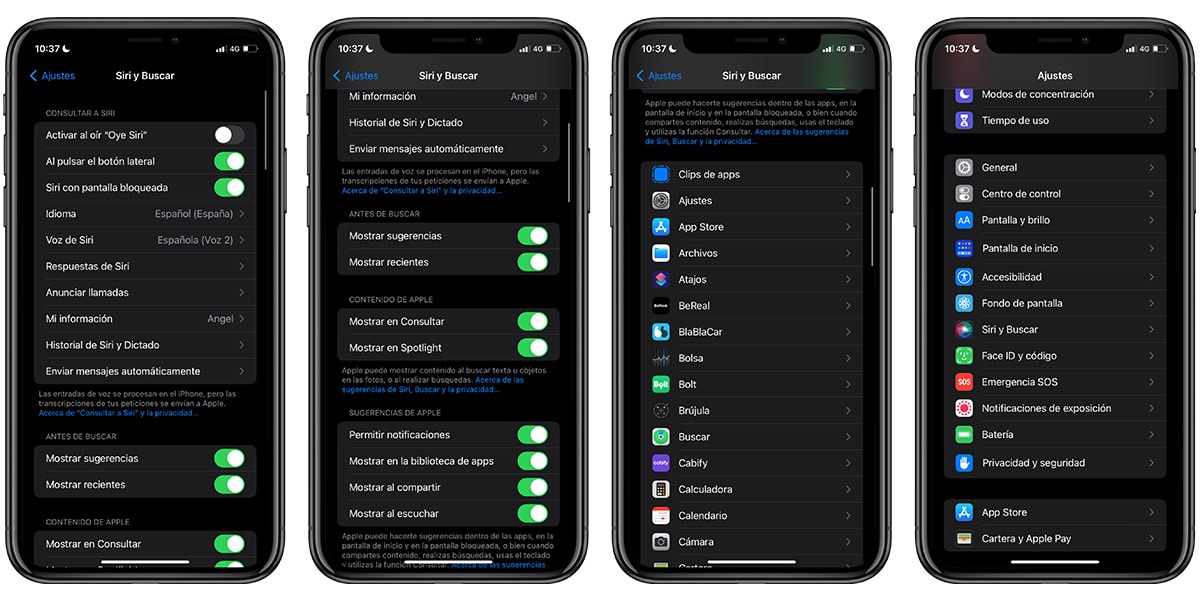
All the Siri essential settings They are found within the Settings of iOS or iPadOS. Once inside, these are the settings that we can change around the virtual assistant:
- Activate when you hear Hey Siri: One of the options that Apple implemented with its assistant was the ability to invoke it without having to press any button. To do this, if we have this option activated, we can open Siri simply by saying "Hey Siri" anywhere we are within iOS or iPadOS.
- When pressing the side button: If you are one of those who accidentally press buttons when you put your phone in your bag, you may prefer to only be able to invoke Siri with the previous option and eliminate the possibility of invoking it through the side button. If you want to disable this feature, make sure the button is not green.
- Siri with screen locked: If you need to have Siri available even when the screen is locked, turn this feature on. From the locked screen you can open the assistant using the side button or through "Hey Siri" depending on the options you have activated in Settings.
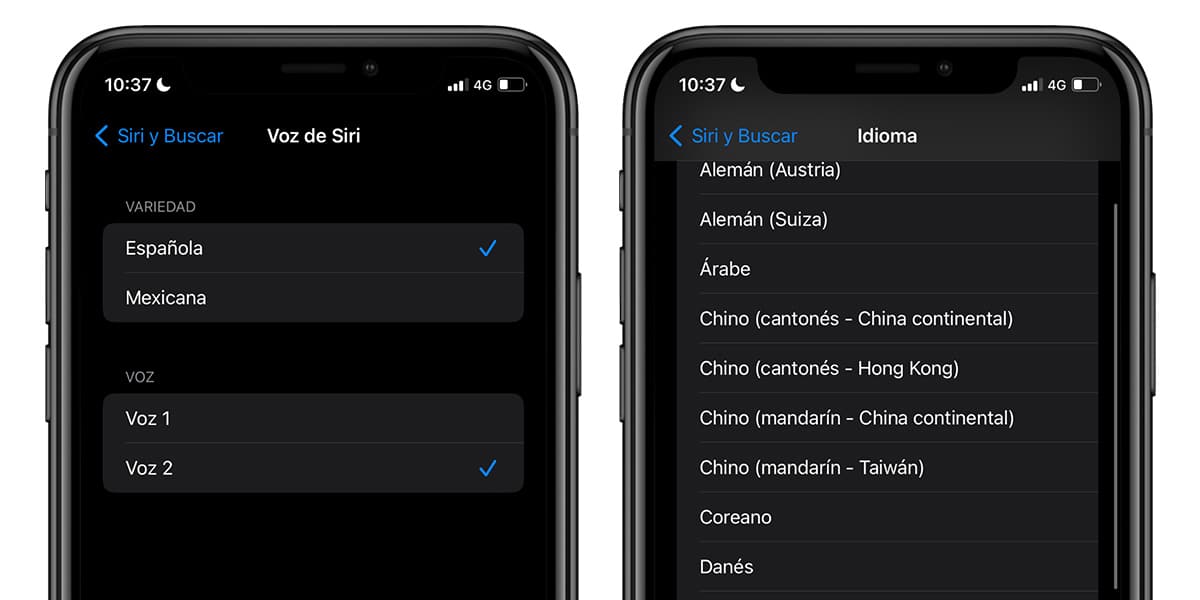
- Language: Siri needs to understand us and for this we have to make sure of the language whose inputs wait. To do this, we will have to select the language in which we are going to speak to it from a fairly long list of languages supported by the assistant.
- Siri voice: Within this menu we can select the accent and the voice that we want for our virtual assistant. We will give more importance to these last two settings in the next section.
- Siri Answers: This set of options are interesting for several reasons. First of all, we will be able to decide when Siri will detect that we have finished speaking to send us a response. We can let it answer automatically when it detects that we have finished speaking or not. On the other hand, we can tell Siri to show on the screen in writing both what we have asked for as well as their responses. These features are dedicated to the Accessibility sector of iOS and iPadOS.
- Announce calls: the virtual assistant can also announce the names of the people who are calling us on certain occasions. We can modify this between different options: always, only headphones, never or headphones and car. With this function we will know who is calling us without having to look at the phone and get distracted.
- My information: Siri also personalizes our responses based on our information: our names, our relationships with some contacts in our address book, our residence, and much more. For it, we will have to add all our information in our profile within the Contacts app. Later, we will enter this section of the Settings and select our contact to import all the information to Siri.
- Siri and Dictation History: If you want to prevent this information from being stored, enter this section and delete the history from time to time.
- Send messages automatically: One of the things that Siri allows you to do is send messages through compatible applications such as WhatsApp or iMessages. If we have this option activated it will not ask us for a confirmation of the message to be sent. However, if we deactivate it, Siri will ask us to confirm the sending of the message in question.
The rest of the options included in the Settings are included within secondary functions of iOS and iPadOS used to improve the experience both in the general search engine (Spotlight) and in the internal dynamics of the operating system:
- Before Apple Search and Content: if we use Spotlight we can allow Siri to show suggestions and recent
- Apple Tips: Siri also tracks our tastes and preferences and shows us information related to us that it thinks we might like. That's why we can enable notifications from Siri, display information in the App Library, and other features that enhance the experience on iOS and iPadOS.
Finally, we have a list of all the applications that we have installed on our device. One by one we can decide if we want Siri to learn from the use we give to each application to become smarter and more akin to the use we give to our device. We can also limit Siri's access to information for each app to display within Search or display Suggestions. Each application can be customized depending on the interests or tastes of the user.
How do I change Siri's voice on my iPhone or iPad?
We will specifically focus on this section in show how to change the voice and language of our virtual assistant on iOS and iPadOS:
- We open Settings> Siri and Search
- select Language. The first thing we have to configure is the language in which we are going to speak to Siri so that it understands us. By default, the language used as the system language is used.
- select Siri voice. Within this section will appear the varieties of voices in two sections. In the first section we can select the type of variety of language. For example, within Spanish we have Spanish or Mexican, with two totally different accents.
- Now, we can hear the different voices available clicking on each one of them: Voice 1, Voice 2, etc.
Once we have decided which voice you want Siri to use, we will have to download voice since not all voices are downloaded. Once we click on the one we want, we will be notified that a download of around 50-60MB. If we are without a Wi-Fi connection, iOS will ask us if we want to download the voice with mobile data. If we are in a Wi-Fi network we will not have any problem.
When we have finished carrying out these steps, we can verify that Siri's voice has completely changed to the one we have decided by invoking it through the Side button or the "Hey Siri" command depending on the settings you have defined.